Help Center
Home > Help Center > Getting Started
Getting Started
Chat Components
Customise Chat Interface
Getting Started
Getting Started
- How to setup WeConnect account
- How to create a chat interface
- What is Conversational Chat interface
- How to test a chat interface
- How to install chat interface
- Glossary of key concepts and features
App Installation Steps
Chat Components
Chat Components
Customise Chat Interface
Customise Chat Interface
Here you can find all the instructions required to configure the chat interface as per your branding requirements.
Let’s start with getting familiar with the Design page.
When you are inside the chat interface, navigate to Builder -> Design

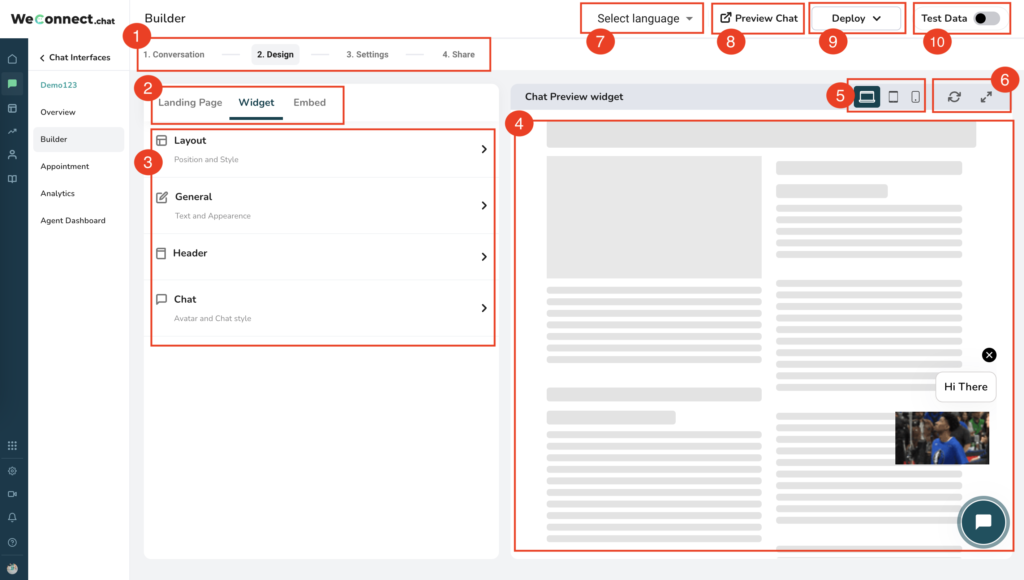
Refer to the above screenshot for each point explained below:
- Builder Navigation: These are the 4 steps that allow you to build a chat interface is easy to use intuitive way.
- Type of chat interface: WeConnect.chat supports three types of chat interface outputs.
- Landing Page – This creates a dedicated full-page output for the chat interface. A separate URL is generated to share the landing page.
- Widget – This is the most commonly used chat interface output. It shows a chat bubble on your website, which opens a chat screen to interact with. Generally, it’s displayed on the Left or Right bottom side of a Website.
- Embed: This output allows you to embed a chat interface inside any part of your webpage. It is an iFrame that loads the chat interface on any webpage.
- Customise chat interface output type: Here you will be provided with detailed options to customize the appearance of specific chat interface output. Note: Some settings are common and will apply to all output types.
- Customise chat widget output
- Customise Landing page output
- Customise Embed output
- Preview area: Here you will be able to show the instant preview of all the settings applied on the left side in point no.3.
- Device switcher: Here you can switch on which device you would like to see the preview. A preview can be seen on Desktop / Tablet /Mobile.
- Preview area controls: Here you have two options.
- Reload: To refresh the chat inside the preview area without refreshing the browser page
- Expand: Use this to see the preview in the expanded view.
- Select Language: This will show a dropdown of all supported languages. Select a language to create an existing chat interface in another language. Also, you can switch the language of the chat interface anytime.
- Preview chat: Use this to open the preview of the landing page chat output in the new tab
- Deploy: This is a shortcut to get the installable code for each output type.
- Test data: Use this toggle when you don’t want to collect the data during the testing of your chat interface. This is helpful to avoid test data with live data.

