Help Center
Home > Help Center > Agent Dashboard
Agent Dashboard
This is the default page for agents.
To visit this page, from the main navigation bar go to – Products – Raibu.
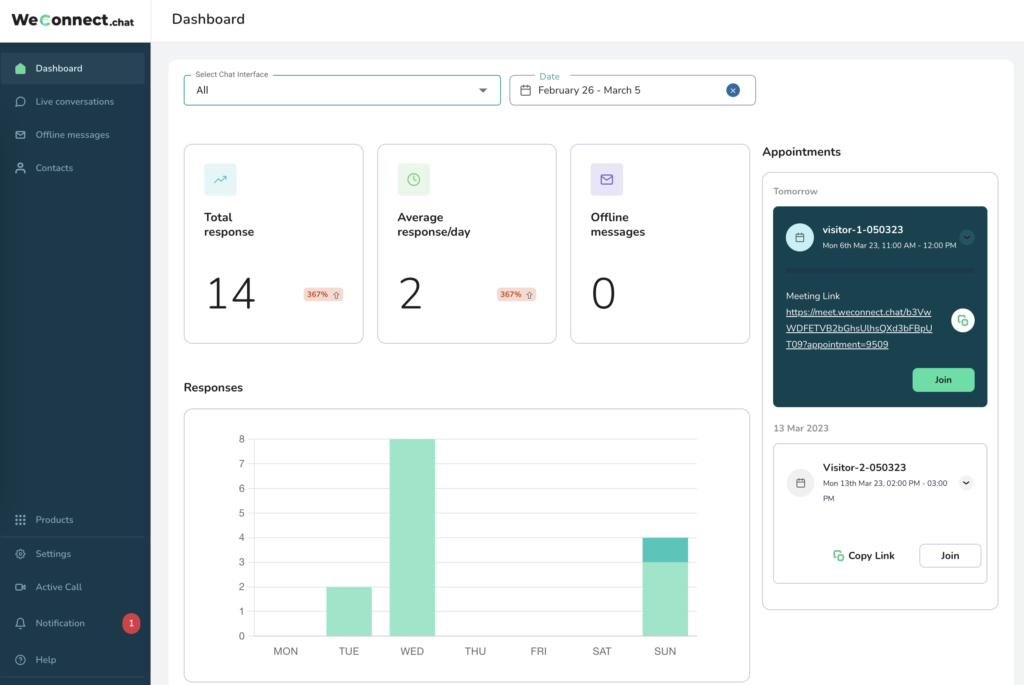
On the agent dashboard, agents can see the high-level metrics related to living chat/video chat and offline messages.
By default data shown is for the last week and for all the chat interfaces.
If you want to see data for a specific chat interface for a specific date range then do the selections accordingly.
Metrics:
- Total Responses – This will show the total live chats/video chats that happened in a given date range
- Average response/day – This shows a daily average count of how many live chats/video chats happened for a given date range
- Offline messages – This will show the total number of offline messages received for a given date range
- Bar chart – This shows last week’s data. Data is classified based on the total visitor for a given day and the count of contacts converted from visitors.
- Appointments – This will show the list of upcoming appointments. Agents can join the appointments from the given link or using the “Join button”

Live conversations
This is the most important page for agents in their daily work schedule.
On this page, agents will be able to interact with the visitors.
Prerequisite:
To use this page a “Live chat / human takeover” component has to be added in builder – chat conversation. Click here to know more, about how to add.
There are 3 ways by which agents can interact with visitors:
By initiating human takeover using the “Assign to me” button whenever the visitor starts the conversation – Once the agent does this, a message will be shown to the visitor “Agent has taken over the chat” and Agent can send the message to the visitor using the message box
By accepting a request for the Live chat – Once the agent accepts this, a visitor will get the message “Agent X has accepted the request” and chat can be started. An agent can send the message to the visitor.
By accepting the request for the Video chat – Once the agent accepts this, a video link will be generated and shown to the agent. An agent can start the video call using a video link. Visitors will also get the link to join the video call.
- Agents can qualify the visitor as a contact (lead) using the button “Mark as Contact”. This will help to extract the contacts and send them to external CRM applications using integrations.
- There are many fields given to save the details about the contact
- Agent can also save quick sticky notes about the visitor using the Notes section
- Agents can apply various filters, sorting and searching to see the required visitors list

Fig.1: Human takeover

Fig.2: Live chat request (Similarly video chat request also comes)

Fig.3: Active chat conversation
Offline messages
- Whenever visitors requests live chat or video chat it has to be accepted by Agents within the set time by the administrator.
- If agents, do not accept the request, visitors will be provided with the offline form to submit the necessary contact information.
- Once visitors submit the offline form, a new message will be received and available on the “offline messages – Inbox” page
- From the inbox, agents can reply to the visitor’s message and mail will be sent to the visitor on provided mail ID
- Visitors also get the link to reply to the thread by using the reply link shared over mail by the system.
- Agent can mark a particular message as “starred” by using a star icon
Pre-requisite:
To show the offline form to the visitors, an offline form has to be enabled on the component “Live chat/ human takeover”. Click here to know more about how to enable the offline form.

Fig.1. Offline form for visitor

Fig.1. Offline messages received in agents’ inbox
Contacts
- This is the mini CRM, here all contacts collected by using chat interactions are shown.
- A date filter is available to select the contacts for a specified duration.
- These contacts can be exported to external CRM applications by using various integrations supported by WeConnect.Chat.

